background

Monday, June 27, 2011

A Few Odds and Ends

First of all, let me say that Gail was so appreciative of all the wonderful comments left about her grandson's quilt and her first quilting efforts. I forgot to mention that she also learned how to sew on a binding. She did that completely by hand along with the label. Thanks for all the encouragement. Secondly, I want to comment on the "big stitch" technique. I'll do a little tutorial soon on some of the things I learned since a lot of you said you had never tried it. And yes, my Mother's and sister's flag quilts got finished eventually :)!
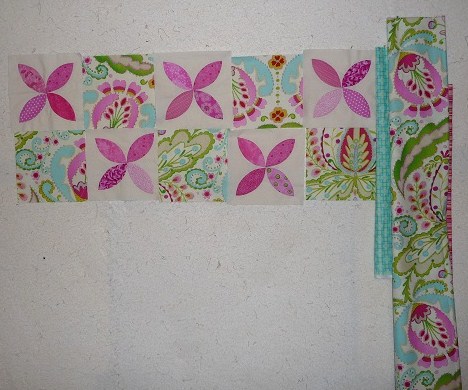
Now, on to my newest granddaughter's baby quilt. I've finished the applique blocks, and was trying to decide on a setting. Originally, I had 5 blocks across. That made the inside a little too big, and didn't give me a lot of border options.

I briefly thought about setting them on point and adding a sashing. While I liked this it also made the center part too big. I played with several different inner border options and settled on this. I chose the pink and the blue scraps left over from the bumper pads. They are part of the Kumari Garden line. I cut them to finish at 1". I originally had planned to do a checkerboard border, but it was just a little much for me. This was just enough to pull some color toward the outer border.
My last design element, was to pick a "K". I decided to add an initial block to the front. You'll have to wait and see which one I picked. Or maybe I'll ask you to guess which one I chose?

I'm ready to baste and start quilting!! My favorite part :)!
Have a wonderful day,

-Karen

Thursday, June 23, 2011

Patriotic Office Art

Summertime is such a wonderful season. It includes (sort of) Memorial Day, Flag Day and the 4th of July. What a fun time to hang a flag quilt. My office looks quite festive.This quilt has such a fun memory/ story. I was passing through Stone Mountain, GA in July of 1996. The quilt shop had this kit hanging in their shop in honor of the Summer Olympics being held in Atlanta, GA that year. I loved it!! So did my sister and my mother. I ended up calling the shop from N.C. and ordering two more kits, which I picked up on my way back to Florida.

Everything was included - what a deal :). I tried using the "Big Stitch" for the first time. I used perle cotton and a bigger needle. I didn't love it, in fact, this is the only thing I've done using this technique.

But it does look kind of cool. I used 1/4" stitches in the body of the quilt, and 1/2" stitches done in a star shape in the border. This is another quilt I need to re-do the binding on - LOL!!! It's so nice to see improvement in our work :).

Until next time,

-Karen

Tuesday, June 21, 2011

Gail's first quilt!

This is my friend Gail. We work together at the law firm. She became a first time Grandma a few months ago to a precious baby boy. This is her first quilt, completely pieced by her on her lunch hour here at work!!I had recently seen this great pattern on Moda Bake Shop and thought how good it would look in little boy colors. Since I wanted to make it smaller, I re-drafted the blocks. I also made it rectangular instead of square (I know, I have issues...LOL).

Here we are - teacher and student. Doesn't she look proud?? I think (hope) we all remember that feeling of accomplishment when we finished our first quilt :).

The baby's nursery is cream and brown, so I think Gail did a great job. We bought a few pieces of fabric that co-ordinated with the border fabric, then we raided my stash!

Gail's son had a beloved Husky since he was a boy. "Timber" is no longer here, but we found this wonderful fabric and put a panel of it on the back. I think it will be great for "tummy time" :).


I quilted this in an overall swirl pattern based on the design in one of the fabrics.

Congratulations Gail - you are now a quilter!!!

Until next time,

-Karen

Thursday, June 16, 2011

Changing Gears

Wedding Memories Linger, and they will have to linger a while longer (see previous post) :). A few weeks ago, I showed you the bumper pads I made for my new granddaughter's crib. We went to Asheville for the holiday weekend and I also made the crib skirt while we were there. My DIL has chosen this wonderful print (Kumari Garden by Dena Designs) for the crib skirt and the curtains. The walls are painted this soft blue/aqua color - it's simply beautiful!
I finished the curtains and sent them up to her. I hope to have a picture to share soon. In the meantime, I've been trying to design a baby quilt using this fabric. I decided to use this print as the focal fabric (since it had all the colors to tie the room together) and my jumping off place for the colors.

This fabric has so much vivid color in it, I decided to let the fabric be the star and just pulled out the pink. The large petals are hand appliqued.

I designed this on EQ7 - this is the Joseph's Coat block. I will use the focal fabric for the border also. Each one so far gets a little better. Applique is definitely a skill that suffers if you don't use it. But it's coming back. The first block turned out so "rough" that I've decided to use it for the label on the back LOL!!

I'm thinking a small aqua inner border and the red stripe for the binding. There are a couple more elements to the quilt I'll show next time (I haven't made them yet) but I hope they look as cute as I think they will!!
This will be a very HAPPY quilt. Each petal block takes me almost an hour so it will take another week or so before the top is done (you know I've got that work thing during the day). Good thing the baby isn't due until August.

Until next time,

-Karen

Thursday, June 9, 2011

More Templates and Progress

One stitch at a time, my quilt is emerging. It's hard sometimes to get the quilting to show, so I've tried to let the shadows show the pattern. Needless to say, I am having a blast quilting this. It has been amazing to see this quilt take on a personality of its own. When I decided to use the wedding quilt scraps to make a log cabin quilt, I must confess I didn't know exactly what it would look like, but I knew I wanted to make it special. So far, I'm very satisfied :).
I had picked a different quilting pattern design but it didn't look right and I ripped it out. After studying things for awhile, I decided on this design. One thing I learned a long time ago is, if you are not happy with something stop immediately and re-examine. If you need to rip, do it! I have never regretted any decision to rip out something I wasn't happy with.

I was so excited to see the circles form as I quilted the dark sections of the log cabin blocks. As this was not part of my original plan, I had no idea what would happen and I was quite pleased. Here's what the corners will look like. It's not quite finished yet, the stitching will go all the way out to the white section.

Here's what my floor usually looks like with all my tools laying around.

I started with June Tailor's Around the Block ruler but found it was too hard to get the marking pens thru the slots (the batting didn't give me a good solid surface). So I used it to cut my own - by cutting up a plastic calendar for the arches. I have to use both a blue marking pen and the white Clover pen as I go over both light and dark sections.

Then I made a different set for the half inch markings. It might seem like it would take a long time, but in the end it saves time because I have control over each line. I've almost finished this section. I made a list, and so far this is what I've finished: the 4 center blocks, the feather row, 8 fan blocks, 12 full square blocks and then 16 fan blocks (almost done). Doing this row by row has been manageable and logical. Stay tuned, there's more to come :)!!

Until next time,
-Karen

Monday, June 6, 2011

It starts with a plan

I have finally starting hand quilting my log cabin "Wedding Memories Linger". I knew I wanted some feathers in the inner most border so I kept doodling until I got the proportions right. I picked the best section and cut that out. I then outlined it with a Sharpie and covered it with packing tape. I used this as a template and traced it onto the quilt. I first tried a light box but the paper kept moving so I traced it from the top.


It is very challenging to keep my stitches even going through all the seams and seam allowance's of the logs. Each one finishes at 3/4" so there isn't much room to get a rhythm going.


But I knew as soon as I started that the look of the feathers is exactly what I had hoped for. I finished the inside section by stitching in the ditch and then stitching down the middle of each log. I'm doing this part by just eyeing it, so it's not perfect. The slight wobbles add somewhat of an organic feel (at least that's what I'm telling myself) LOL!!


I am absolutely thrilled with the progress so far. There's lots more to come :).


Until next time,


-Karen